If you have been paying attention to the AI coding space, you know we have moved past the era of stateless chatbots. We are now orchestrating stateful, autonomous coding agents capable of executing complex, multi-step workflows. But this rapid evolution brought a massive headache: standard proliferation.
Three months into using AI agents on a production codebase, you might find yourself correcting the same mistakes every session. Every tool wanted its own configuration file. Cursor wanted .cursorrules, Claude Code wanted CLAUDE.md, and GitHub Copilot wanted .github/copilot-instructions.md. Our repositories quickly turned into fragmented markdown museums for confused bots.
Fortunately, the industry woke up. Enter the .agents standard—a unified, cross-platform architecture backed by the Agentic AI Foundation and the Linux Foundation. Here is how it fundamentally changes how we build software with AI.
The Machine's README: AGENTS.md
At the core of this new paradigm is a single file: AGENTS.md. You can think of it as a "README for machines". While your traditional README.md is optimized for human developers (quick starts, project descriptions), AGENTS.md is strictly optimized for your AI agent.
Located at the root of your repository, it acts as a high-level router. Instead of dumping your entire project's history into the LLM's context window—which obliterates its attention budget—AGENTS.md provides explicit, shallow instructions. It defines the agent's identity (e.g., "You are a Senior TypeScript Engineer"), outlines basic setup commands, and tells the agent exactly where to look for deeper context.
Progressive Disclosure: The .agents Directory
If AGENTS.md is the router, the .agents hidden folder is the database. Injecting massive product requirement documents and architecture guidelines into every prompt is a guaranteed way to pollute the context and induce AI hallucinations.
The .agents directory solves this using a psychological and computational principle called Progressive Disclosure. The agent is given a map of available knowledge, but it only loads specific files when the task demands it. A standard implementation looks like this:
.agents/rules/: Invariant behavioral guidelines, like strict coding standards..agents/wiki/: High-level domain and architecture guides..agents/personas/: Specialized profiles, allowing the agent to wear different "hats," like a QA or Security Engineer..agents/skills/: Reusable procedural workflows and capabilities.
Skills vs. MCP: The Ultimate Syngery
As you dive deeper into agentic architecture, you will inevitably hit a crossroads: should you build an Agent Skill or a Model Context Protocol (MCP) server? The best software creators know how to use both.
MCP (Model Context Protocol) is the "USB-C port for AI". It provides raw, structured technical capabilities, connecting your agent to external databases, Slack, Jira, or Google Drive via strict, OS-level process boundaries. MCP gives your agent the ability to do something, but it does not teach it why or how to do it according to your company's business logic.
Agent Skills (.agents/skills/) provide the missing reusable procedural knowledge. While an MCP server grants your agent the raw technical ability to query a database or access an API, it does not understand your specific business logic. An Agent Skill acts as a semantic training manual, teaching the agent the exact sequence of steps to perform a workflow—such as fetching data and formatting it into a standardized status update.
A skill is packaged as a folder containing optional helper scripts, reference documents, and a required SKILL.md file. This core file uses YAML frontmatter to establish its identity and define strict permission gates (like the allowed-tools parameter), followed by plain-text Markdown instructions.
Here is an example of what a SKILL.md file looks like for an automated standup generator:
---
name: weekly-standup
description: Analyzes git commit history to generate a formatted weekly standup report.
version: 1.2.0
allowed-tools: Bash(git:*) Read
---
# Instructions
1. Execute `scripts/fetch-commits.sh` to retrieve the user's git log for the past 7 days.
2. Read `references/standup-template.md` to understand the required markdown output format.
3. Categorize the raw commits into "Features," "Bug Fixes," and "Chores."
4. Output the final markdown report directly to the user.
By combining structured MCPs for technical reach and Agent Skills for step-by-step reasoning, you give your AI both the power to act and the wisdom to execute tasks correctly according to your team's conventions.
Getting Started
The barrier to entry for setting up this architecture is incredibly low today. You no longer have to build these folders manually. Using the dotagents CLI tool, you can instantly scaffold a compliant architecture in any repository.
Just run npx @sentry/dotagents init to create your agents.toml manifest and .agents/skills/ directory, and you can start adding capabilities directly from open-source repositories. Because different IDEs still look in different namespaces (like .claude/ or .github/), the CLI automatically handles symlinking, ensuring your .agents folder remains the single source of truth across all platforms.
The gap between developers who copy-paste prompts and those who engineer robust agentic systems is widening rapidly. Stop treating your AI like a stateless chatbot. Give it a memory, give it skills, and let it work.
]]>
If you think Stoicism is about suppressing your emotions and being a feelingless robot, you're dead wrong. This is arguably the most practical philosophy ever created. A philosophy born not in quiet academic halls, but out of chaos, shipwrecks, and political tyranny.
Here is everything you need to know about Stoicism to get started, filtered through the lens of modern life. No academic fluff. Just what works.
It All Starts With a Shipwreck

Picture this: you lose your entire business, all your wealth, and find yourself penniless in a foreign city. That's exactly what happened to Zeno — a Phoenician merchant whose ship sank. Instead of giving in to despair, he discovered philosophy in Athens and started teaching on a painted public porch (in Greek, Stoa — hence "Stoicism").
The key lesson? You can't control the shipwreck. You only control what you do after it.
The early Stoics had a brilliant metaphor: You are like a dog tied to a moving cart. The cart (life) is going wherever it wants. Your choice is simple — you can trot cheerfully alongside it, or you can lie down and get dragged. But the cart is moving either way.
The Four Pillars (The Cardinal Virtues)
The Stoics believed that a good life rests on four virtues. They are independent but work in sync.
- Courage: This isn't just charging into battle. It's the moral courage to be yourself. To think for yourself, to speak the truth when it's uncomfortable, and to put your comfort on the line. The alternative to courage isn't just cowardice — it's apathy and not really living at all.
- Discipline / Temperance: This is your ability to control yourself. Knowing when to hit the gas (get off the couch) and when to hit the brakes (don't burn out from overworking). In a world of constant noise and cheap dopamine, having boundaries is a superpower.
- Justice: Forget the legal system. We're talking about ethics here. The Stoics believed we were made for each other. Justice is the ability to step into someone else's shoes, to not rush to judge, and to understand that we are all part of something bigger.
- Wisdom: The ultimate filter. Wisdom is what helps you know what is worth being courageous about and when you need to be disciplined. It's not given for free — it's earned through experience, reading (conversations with the dead), and realizing what actually matters.
The Roman Giants: The Big Three
While the Greeks were the theorists, the Romans battle-tested Stoicism in real life. And by "real life," we mean running empires, enduring slavery, and surviving under crazy tyrants.
- Seneca (The Senator): The second richest man in Rome, advisor to the unstable Emperor Nero. Seneca is the man of compromises — trying to manage the chaos from the inside. Despite his contradictory life, he left behind the most beautiful and brutally honest essays on managing time, anger, and anxiety.
- Epictetus (The Slave): Born into slavery, physically abused, but absolutely free in his mind. He is the original source of the idea that true freedom isn't a social status, but a state of mind. His message is simple: There are things up to you, and things not up to you.
- Marcus Aurelius (The Emperor): The most powerful man in the world, who could literally do whatever the hell he wanted. Instead, he sat in his tent at night during a war and wrote a personal journal ("Meditations") just to remind himself not to be a jerk. It's the playbook of a man trying to keep his sanity under the crushing weight of responsibility.
Your Stoic Toolkit (The Practices)

How do you apply all this today? Here are a few tools — tested by centuries — that beat any modern "life hack" trend.
Perspective Shifts (How to see the world differently)
- The View from Above (Plato's View): Imagine events as if seen from high overhead, taking a bird's-eye view of everything all at once. By zooming out across history, time, and space, you can see how insignificant our daily squabbles and perceived emergencies actually are. This practice reminds us of our brief place in the vast cosmos and induces a profound sense of calm.
- Memento Mori (Remember You Must Die): You are not immortal. Seneca says we aren't moving toward death — we are dying every day. The time that has passed already belongs to death. Use this fact not to despair, but to filter out the meaningless noise from your life.
- Amor Fati (Love Your Fate): Don't just accept what happens to you — love it. Every hardship is an opportunity to practice virtue. Project failed? An opportunity to learn a new lesson. Met a difficult person? An opportunity to train your patience.
- Hierocles' Concentric Circles (Cosmopolitanism): Visualize your social world as a series of concentric circles, starting with yourself and expanding outward to family, neighbors, fellow citizens, and all of humanity. The Stoic task is to actively pull these outer rings inward. Treat strangers like neighbors and neighbors like family, cultivating a profound sense of justice and duty to the common good.
Daily Habits (How to train your mind in peacetime)
- Morning and Evening Meditations: Bookend your days with structured reflection. In the morning, prepare for the day by anticipating the difficult tasks and obnoxious people you might encounter so you aren't caught off guard. In the evening, review your day unflinchingly: ask yourself what bad habits you curbed, what mistakes you made, and how you can improve tomorrow.
- Voluntary Hardship: Intentionally subject yourself to temporary discomfort during times of peace and prosperity. Eat meager food, wear shabby clothes, or take cold baths to act as a training ground for resilience. By experiencing hardship on your own terms, you prove to yourself that your deepest fears are easily survivable.
- Contemplating the Sage (Modeling Virtue): When facing a difficult situation, ask yourself what a wise mentor like Seneca or Marcus Aurelius would do. Imagine that this benevolent mentor is constantly observing your actions and thoughts. Knowing you have a "witness" standing by creates self-awareness and helps you align your behavior with your highest values.
In-the-Moment Tactics (How to handle a crisis)
- The Dichotomy of Control: Divide your life into two columns: "What I can control" and "What I cannot control." Learn to become brutally indifferent to the second column. Only worry about the first.
- Negative Visualization (Premeditatio Malorum): An invention of Seneca. Instead of picturing everything going perfectly, visualize the worst-case scenario. It's not depressing at all — it's actually liberating. You realize that even if things go totally sideways, you'll be fine.
- Objective Representation (Phantasia Kataleptike): Strip away emotional rhetoric and value judgments, and describe events purely factually. Remind yourself that fine wine is merely fermented grape juice, roasted meat is a dead bird, and a purple robe is just sheep's wool dyed in shellfish blood. By stripping things down to their bare elements, you remove their power to overwhelm you.
- Cognitive Distancing: Remember that it is not events that upset us, but our judgments and opinions about those events. When you feel a strong negative emotion, take a step back and remind yourself that it is just a feeling, automatic thought or an "impression". Speak to the thought directly, stripping away its power to shape your reality.
- Depreciation by Analysis (Divide and Conquer): If a situation or a craving feels unbearable, break it down into its smallest components. Isolate the present moment from the past and the future, and ask yourself what specifically in this exact moment is so unbearable. By tackling hardships one tiny piece at a time, you prevent your mind from catastrophizing.
- The Reserve Clause (Hupexhairesis): Undertake every action with a backup option or caveat, such as "Fate permitting" or "God willing". Your job is to try your best and aim the bow, but external results are ultimately out of your hands. By attaching a reverse clause to your goals, you can pursue them vigorously while remaining peacefully detached from the outcome.
The 80/20 Rule of Stoicism (Final Thoughts)
If you only remember one thing from this guide, let it be this:
You don't control what happens to you. You only control how you respond to it.
The harder and messier the situation, the greater the opportunity to show character. Stoicism isn't a book you read once and put on a shelf. It's a daily practice. Every day you wake up and start over.
As Marcus Aurelius told himself:
Fight to be the person philosophy tried to make you.
]]>In recent years, something fundamental shifted in how we build software. We transitioned from the era of shy "copilot" assistants waiting for our approval on every line of code, to the era of always-on, autonomous agents.
Paradoxically, the faster these systems generate code, the faster experienced engineers burn out. We fall into the trap of "cheap dopamine"— the AI spits out a working feature in minutes, our brain celebrates the quick win, but during the architectural review, we realize we've built a chaotic house of cards that must be entirely rewritten.
To survive and thrive in this new reality, we have to stop competing with machines on typing speed. We must shift our role.
AI is an Enhancer, Not a Replacement
Before we dive into how we engineer these systems, we need to address the philosophical elephant in the room. Artificial Intelligence is merely an enhancer of our own human skills.
Think of it this way: until now, we have been digging with shovels. Suddenly, someone handed us the keys to an excavator. If you know how to operate it, you can build a skyscraper. If you don't, you can easily demolish the whole neighborhood. AI amplifies what you already have—it can make you exponentially better, but it can also make your output exponentially worse if you lack direction.

Because of this, three things will never be replaced by AI:
- Intent: The human spark. The "why" behind the software and the problems we choose to solve.
- Taste: Our aesthetic and architectural judgment. The intuition that tells us what is elegant, what is scalable, and what provides a great user experience.
- Constraints: The boundaries we set. The strict rules and business logic that give shape to the AI's raw, chaotic generative power.
AI is the executor. We are the visionaries. The evolution of how we guide this executor happens in three distinct stages.
Stage 1: Prompt Engineering (The Illusion of Control)
This was the dawn of AI coding. The entire focus was on how to ask the "perfect" question to get the perfect response in a single session.
The problem? Large Language Models (LLMs) are stateless. The more you force them to solve complex, multi-file architectural problems via one massive prompt, the more "slop" they generate. Writing massive prompts to build an entire app in one shot turned us into micromanagers of machines with zero short-term memory.

Stage 2: Context Engineering (Escaping the "Dumb Zone")
When we realized prompts weren't enough, we moved to context management. Here, the goal isn't the length of the instruction, but its purity. If you dump entire files, test logs, and JSON outputs into a chat window, you enter the "Dumb Zone." The solution is intentional context compaction through the RPI (Research, Plan, Implement) method:
- Research (The Human-First Phase): Research begins with us, outside the codebase. We scour the internet, explore new patterns, and think deeply about the architecture. We apply our Taste and Intent. Once we have a clear vision, we instruct the AI agents to research the existing codebase, mapping the internal logic to match our external findings.
- Plan (Compression of Intent): While we are the ultimate PRD definers who provide the core constraints, in this phase we also use specialized planning AI agents to build the actionable plan for the actual task. Using our document, prompt, or spec, the planning agent generates the exact steps, file names, codebase instructions, and testing methods. Human intervention here is mandatory.
- Implement (Reliable Execution): The agent executes the plan in a clean context window, free from the noise of the research phase.
Stage 3: Harness Engineering (Building the Dark Factory)
This is the future and the highest level of AI programming today. A Harness Engineer doesn't just manage the context for a single chat session. They design the system architecture where autonomous AI agents live, work, and pass the baton over long-term, complex tasks.

Harness Engineering is built on three foundational principles:
- Legible Environments: Agents need a structured starting point. You must implement progress-tracking files (like
progress.txtand a centralagents.md) so that any new agent entering the workspace instantly knows what is finished and what the priorities are. - Ultra-Fast Verification: AI agents lie. They will prematurely declare a task "done" when the code is broken. The Harness Engineer builds programmable constraints—strict linters, end-to-end tests, and tools like Puppeteer—so the AI can visually test its own work and fix bugs autonomously.
- Trust in Generic Tools: Instead of building fragile, bespoke internal tools for the AI, successful systems rely on basic computer commands. Simple utilities such as Bash, Python, and JavaScript execution are foundational tools. Because the AI already knows standard commands (
grep,npm run) infinitely better than a highly specific, custom JSON tool you built yesterday, providing these foundational tools allows smart AI agents to dynamically build their own custom tools on demand.
The Multiplication of Error: Beware the High-Leverage Cascades

With this incredible new power of Harness Engineering and Dark Factories comes a corresponding, and much less celebrated, responsibility. As the hierarchy of error leverage shows us, AI is an enhancer, not just of positive human skill, but of every single input. Mistakes at the top of the pipeline do not just scale linearly; they are amplified a hundred, a thousand, or even a hundred thousand times.
Consider the conceptual model of a "Hierarchy of Error Leverage." A single line of bad code might result in a single bad line. This is the shovel work we are used to.
But move up the hierarchy of logic, and everything changes.
- Specification (Wrong Problem): Defining the wrong problem can multiply to 10,000+ lines of wasted, but seemingly flawless, code.
- Core Commands/Infrastructure (CLAUDE.md): The very environment constraints we create are the highest leverage of all. A single bad line here—a misinterpretation of a standard, a fundamental assumption about core architecture—doesn't just produce bad code; it creates a cascade of up to 100,000+ lines of structurally unsound "brownfield."
This amplification cascade is the hidden danger of the Dark Factory. When you automate the bricklaying, you must ensure the blueprints—your specification, your taste, and your intent—are absolutely perfect. The AI will build exactly what you tell it to, but it will not fix a flawed specification. If we ship with "vibe coding" specification, we will not just get a few bugs; we will receive a structurally compromised software asset. We must operate with the foresight of a civil engineer, not just a casual observer. We must become the ultimate validators of our high-taste commands and specifications.
The Philosophical Leap: From Bricklayer to Conductor

We are entering the phase of the "Dark Factory"—a highly autonomous system where humans rarely write or review standard syntax. The specification goes in, and working software comes out.
This does not make the software engineer obsolete; it elevates them. Your true value is no longer in writing syntax (shallow work), but in deep work: systemic thinking, defining clear interfaces (Deep Modules), and writing unambiguous PRDs that serve as meta-prompts for your virtual team.
You are no longer the bricklayer. You are the Radical Generalist. You are the conductor of an orchestra, using your taste, intent, and constraints to turn pure ideas into reality.
As long as you keep creating and giving to the world, your presence will always matter.
]]>If you lived your life entirely through push notifications in 2025, you probably think the world is crumbling. Bad news travels fast – it keeps you clicking. But if you look at the hard facts and real numbers, a different picture appears.
While the world was distracted by noise, 2025 was quietly one of the most important years for human progress. We broke barriers in genetics, stopped relying so much on coal, and even got rival nations to sign peace treaties.
Here are 10 real reasons to be optimistic about where we are heading, based on the science and data of the last 12 months.
1. The "Untreatable" Genetic Barrier Was Broken
For decades, a genetic diagnosis for rare diseases was often a death sentence. In 2025, it became a solvable engineering problem. At the Children’s Hospital of Philadelphia, doctors used a custom-made gene-editing therapy to cure an infant of a fatal metabolic disorder called CPS1 deficiency.
This wasn't a normal drug trial. They mapped the baby's DNA, built a cure just for him, and treated him within six months. The child, who would have previously faced severe brain damage, is now thriving. We have officially entered the era where we can "program" cures for individual people.
2. Cancer Vaccines Are Actually Working
The mRNA technology that saved us during the pandemic has found a new job: fighting cancer. In 2025, results from Memorial Sloan Kettering showed that a personalized mRNA vaccine for pancreatic cancer – one of the deadliest kinds – kept 75% of patients cancer-free three years later.
Perhaps even more surprising? Researchers at MD Anderson discovered that standard COVID-19 vaccines actually prime the immune system to fight cancer better, doubling the survival rate for certain patients on immunotherapy.
3. The Energy Tipping Point: Solar Beat Coal

The old argument that "developing nations need coal to grow" died in 2025. India, the world's most populous nation, saw its coal capacity drop below 50% of its total energy mix for the first time in history.
Why? Money. It is now cheaper to build huge solar farms than to burn coal. Meanwhile, China is projected to have installed nearly 70% of the world's wind power this year, effectively peaking its emissions years ahead of schedule. Going green is no longer just about charity; it's about smart business.
4. We Opened a High-Def Window to the Universe

On June 23, 2025, the Vera C. Rubin Observatory in Chile captured its First Light images. This isn't just another telescope; it's a massive 3.2-gigapixel camera that will photograph the entire southern sky every few days for a decade.
The result will be a "time-lapse movie" of the universe, cataloging 20 billion galaxies and mapping the dark matter that holds reality together. We are moving from static snapshots of space to a real-time streaming view.
5. The Oceans Are No Longer Lawless

For centuries, the ocean beyond national borders (50% of the planet) was like the Wild West. In September 2025, the High Seas Treaty finally got enough signatures to become law.
This allows us to create massive protected areas in the middle of the ocean, which is critical to protecting marine life. Nature, it seems, is also collaborating: 2025 saw the first confirmed scientific proof of orcas and dolphins working together to hunt, showing that cooperation is a winning strategy for survival.
6. Quantum Computing Got Useful

We stopped talking about "Quantum Supremacy" (doing useless things fast) and started seeing "Quantum Utility." Google's Quantum AI team revealed Quantum Echoes, a breakthrough that allows quantum computers to do calculations for chemistry that are actually useful for science.
At the same time, the release of AlphaFold 3 allowed us to predict the structure of all of life's molecules – DNA, RNA, and proteins – compressing years of lab work into minutes of digital simulation.
7. Polio is 99% Gone
In a massive win for public health, the World Health Organization confirmed that global polio cases have dropped by 99% over the last 35 years. Regions like South-East Asia celebrated over a decade of being polio-free, proving that when the world works together on vaccinations, we can wipe out diseases.
8. Peace Deals in the Age of Conflict
Despite the tension in the headlines, 2025 saw the end of some very old conflicts. Armenia and Azerbaijan signed a historic peace agreement, normalizing relations after 30 years of fighting. Similarly, Thailand and Cambodia signed a ceasefire agreement in December to end border skirmishes, proving that diplomacy is still alive.
9. We Can Read Without Glasses Again
It’s a small upgrade, but for billions, it’s magic. The FDA approved VIZZ eye drops, a daily drop that corrects age-related vision loss. It works by shrinking the pupil to create a "pinhole camera" effect, restoring your ability to read up close without needing surgery or reading glasses.
10. The Ozone Hole is Healing
Finally, proof that we can fix the planet. NASA confirmed that the Antarctic ozone hole shrank to its fifth-smallest size in three decades. This is the direct result of the global ban on certain chemicals in the 1980s. It took a generation, but we identified a threat, agreed on a solution, and the planet responded.
The Takeaway:
Progress isn't a straight line, and it rarely makes the front page. But 2025 proved that when we use science, engineering, and teamwork to solve our problems, we don't just survive – we upgrade.
Here is to keeping the momentum in 2026.
]]>Fasting is often reduced to a simple conversation about weight loss, but viewing it solely through that lens misses the bigger picture. When you stop eating for a prolonged period, you aren't just cutting calories; you are flipping a metabolic switch that activates ancient, dormant survival mechanisms.
For the last few weeks, I’ve been diving deep into the chronobiology of fasting—specifically the profound changes that occur during a 72-hour window. The science is fascinating. From sky-rocketing growth hormone levels to the regeneration of immune stem cells, a 72-hour fast is less about "starving" and more about cellular "pruning" and renewal.
To help you visualize and track these invisible milestones, I’ve also built a new tool: the Fasting Planner. But first, let’s look at the data to understand why you might want to fast in the first place.
The Roadmap: Your Body on a 72-Hour Timeline
Fasting isn't a static state; it's a dynamic journey through distinct physiological stages. Here is the breakdown of what is happening under the hood.
0–4 Hours: The Anabolic Phase

- Status: Fed & Processing. Immediately after your last meal, your body is in an anabolic (growth) state. Insulin levels spike to manage the influx of glucose, and your body is busy digesting and storing energy. Cellular cleaning (autophagy) is turned off because your body is focused on processing new fuel.
12–16 Hours: The Metabolic Switch

- Status: Fat Burning Initiation. This is often the hardest part—the "wall." Your liver's glycogen (stored sugar) is running low. As insulin drops, your body is forced to switch fuel sources, transitioning from burning sugar to burning fat. You might feel "hangry" here due to hormones like ghrelin peaking, but this is the sign that you are becoming metabolically flexible.
24 Hours: Autophagy & Ketosis

- Status: Cellular Cleanup. By the 24-hour mark, you have entered nutritional ketosis. Your brain is now running on ketones (beta-hydroxybutyrate), which often leads to a surge in mental clarity and focus. More importantly, autophagy begins to ramp up. This is your body’s recycling program, where cells identify and break down damaged components and misfolded proteins.
48 Hours: The HGH Surge

- Status: Deep Repair & Muscle Protection. There is a common myth that fasting burns muscle. The science suggests otherwise. Around the 48-hour mark, your body fights to preserve lean tissue by triggering a massive surge in Human Growth Hormone (HGH). Recent 2025 studies have shown HGH increases of up to 1,225% during water-only fasting. This hormonal shield protects your muscles while your body aggressively targets fat stores for energy.
72 Hours: Immune System Regeneration

- Status: Stem Cell Activation. This is the "Holy Grail" of prolonged fasting. Research led by Dr. Valter Longo indicates that by 72 hours, the body breaks down old, inefficient immune cells to save energy. This depletion lowers PKA and IGF-1 levels, which signals your bone marrow stem cells to wake up. When you eventually break your fast, these stem cells proliferate, effectively rebuilding a younger, more resilient immune system.
Stop Guessing, Start Planning
Understanding these stages is one thing; tracking them in real-time is another. I realized that most fasting apps are either too cluttered with ads or lack the granular data I wanted to see. I needed a tool that was clean, easy to use, and visually intuitive.
So, I built Fasting Planner.

It is a dedicated tool designed to help you architect your fasting protocols with precision.
Key Features:
- Real-Time Stage Tracking: Know exactly which metabolic phase you are in—whether you are in the "HGH Surge" or entering "Deep Ketosis."
- Visual Calendar: Plan your fasts weeks or months in advance using a user-friendly drag-and-drop calendar interface.
- Weight & Progress Tracking: Monitor your body’s response over time with integrated weight logging.
- Privacy First: Easily export and import your data. Your health data belongs to you.
Whether you are attempting your first 16:8 intermittent fast or preparing for a therapeutic 72-hour reset, having a visual roadmap makes the discipline much easier to maintain.
Check it out here: fasting-planner.harduex.com
Disclaimer: Fasting for 72 hours is a significant physiological stressor. Always consult with a medical professional before undertaking prolonged fasting, especially if you have underlying health conditions.
]]>Ever wondered how Apashe crafts those massive, cinematic bangers?
This article is your backstage pass to the mind of the Montreal-based maestro himself.
Whether you're an aspiring producer, a genre-bending DJ, or just a music nerd—this one's for you.
🎻 Fuse Genres Like a Boss: Orchestras & Basslines
Apashe doesn't just sample strings—he hires a whole orchestra.
For his album Renaissance, he recorded a 65-piece orchestra in Prague. For Antagonist, he went even bigger: the Bulgarian Symphony Orchestra + a children’s choir!
His trick?
Start with MIDI demos using tools like Kontakt and Orchestral Tools → Send them to a pro orchestrator → Record live → Chop, remix, and flip your own sounds like a DJ.
"It's kind of like remixing my own compositions."
Pro tip: Can’t hire an orchestra? Layer strings from Kontakt, blend with cinematic brass, and get creative with resampling.
🎶 Sound Design: It’s Not a Tutorial, It’s an Obsession
Apashe learned sound design the old-school way—messing around for hours.
Forget one-size-fits-all tutorials. He dove deep into DogsOnAcid forum, dissected plugins, and experimented until sounds clicked.
Example: That fat bassline in "No Twerk"?
Not a synth. It's over-processed horns—EQed, saturated, and compressed into oblivion.
"There are no magic tricks... it's trial and error."
Try this:
- Load a brass sample
- Saturate it
- EQ aggressively
- Resample it into a totally new sound
Experiment until you surprise yourself.
🎛️ Mixing While You Compose: Apashe’s Flow
Forget endless back-and-forth between DAWs.
Apashe mixes as he composes—all inside Ableton Live.
He believes in staying in the moment:
- Add EQs, compressors, and reverbs as you build
- Sleep on a track, come back with fresh ears
- Don’t get stuck—he leaves demos for months and revisits them
"If a demo still gives you chills after six months, it’s worth finishing."
🔌Plugins & Gear Apashe Swears By
Here’s a peek into Apashe’s studio:
🎛️ DAW: Ableton Live
🎛️ Orchestral Mockups: Kontakt, Orchestral Tools
🎛️ Sound Design: Melodyne, bx_subsynth, iZotope, Waves, Melda Production
🎛️ Monitoring: Neumann Speakers
🎛️ Hardware: Access Virus C, Korg Electribe, Push
🎛️ Vocal Processing: EQ, Compression, Old Reverbs, and Delays

💭 Philosophy: Do It for the Love, Not the Hype
Apashe’s golden rule?
Make music because you love it. Fame and gigs? That’s extra.
"When I made music to chase bookings, it never worked. When I did it for fun, that's when things clicked."
Don't overthink it. Try new ideas. Blend genres. Create something you love.
🔥 Quickfire Apashe Tips
✅ Keep it fresh: Step away from your track, return later
✅ Layer real instruments: Orchestras + synths = fire
✅ Test new tools: Don't fear plugins, but don't chase FOMO
✅ Chop your own recordings: Remix yourself
✅ Mix as you go: Don’t save it all for the end
✅ Focus on the vibe: Technicals matter, but emotion drives the track
✅ Have fun: It’s a creative playground, not a grind
🚀 Final Words: Create Your Own Epic
Apashe’s approach is simple yet powerful:
- Blend worlds (classical + electronic)
- Experiment relentlessly
- Stay true to your vision
- Trust your gut, not the hype
Now, it’s your turn.
Open your DAW. Mess around. Get weird. Push the limits.
Maybe one day, your tracks will land in a movie trailer too. 🎬

Ever wondered how KOAN Sound creates those mind-bending, hyper-detailed tracks that somehow feel both mechanical and alive?
Let’s dive into the minds of Will Weeks and Jim Bastow (aka KOAN Sound) and pull together their most eye-opening production tips - no fluff, just real insights you can actually use.
"Everything is possible... You can’t do something wrong."
— KOAN Sound
🧠 Mindset First: The Philosophy Behind the Sound
Be Playful and Break the Rules
KOAN Sound’s #1 rule? Forget the rules.
Music isn’t about formulas — it’s about fun and experimentation. Don’t get stuck wondering if you're "doing it right." Start throwing sounds around and play with ideas.
Pro Tip: Their best ideas come when they turn off the analytical brain. No second guessing. Just flow.
🧘♂️ Creativity = Meditation
They describe entering a “meditative state” where time disappears and ideas just happen. That’s the sweet spot. No overthinking, no pressure.
Try this: Dim the lights. Turn off your phone. Loop a sound you love and zone in.
🔧 Master Fewer Tools, Not More
"Learn ONE technique and go deep."
KOAN Sound doesn't chase the latest plugin. Instead, they dive deep into a few VSTs, squeezing every drop of creativity from them.
Pro Tip: Focus on what your current tools can really do before buying the next thing.
🛠 Sound Design Secrets You’ll Want to Steal
Organic Sounds = Human Feel
From plastic bottles crunching to footsteps in snow, KOAN Sound layers in foley and live instruments for textures that feel real.
In "The Zulla", they built percussion using creaky floorboards.
In "Drift", they used a Koshi wind chime.

🔁 Resample. Then Resample Again.
They resample their own basses and instruments repeatedly. This adds grime, texture, and unpredictability.
Technique Highlight: Moist Neuro Bass
- Start with a detuned reese.
- Split into low/mid/high bands.
- Automate each band’s movement.
- Layer filters and EQ before distortion.
- Compress, distort subtly, then resample the result.
Tip: Automate volume per band - especially the high end - for motion and character.
🥁 Real Drums + Fake Tricks = Magic Snares
Their snares often blend:
- Transients from real acoustic drums
- Punch from processed hits
- Tails shaped by distortion and vocoding
They’ve even used Ableton’s vocoder to compress snares and add a “slightly synthetic” character.
🌀 Groove Like a Funk Drummer
Each percussive hit is treated like a musical phrase. Ghost notes, swing, and shuffle give their tracks that bounce.
Plugins they love:
- Superior Drummer
- Uhbik G (for volume-based groove automation)

🎛 Mixing Tips That Glue It All Together
EQ Before You Do Anything Else
“The most powerful sound shaping tool” — KOAN Sound
Learn to:
- Boost with purpose
- Cut what’s not needed
- Think in frequency bands (lows, mids, highs)
This applies to every layer, not just the bass.
📦 Effect Racks: Your Secret Weapon
Using effect racks with wet/dry chains lets you:
- Control reverb/delay with volume automation
- Get precise with FX tails
- Avoid mud in your mix
Ableton Hack: Build an FX rack template once, use it everywhere.
📡 Mono Check = Pro-Level Sound
Always listen in mono to make sure your stereo spread doesn’t kill clarity.
“What sounds amazing wide should also sound good dead center.”
Utility audio effect on the master chain makes this a breeze.
🎧 Mix Around the Loudest Element
Usually the drums. Sometimes the vocal. Identify it early, and build the rest of the mix around it.
Hot tip: A punchy kick needs space. Don’t let your sub or synths crowd it.
🧠 Bonus: The Koan Mindset Outside the DAW
Move Your Body to Move Your Sound
“Exercise is sooo important for a sedentary profession.”
Physical and mental health directly fuel their motivation and creativity. Go for a walk. Hit the gym. Stretch between takes.

🎯 Develop Your Own Sound by Just... Doing You
They didn’t try to sound unique — they just made what felt natural.
“If something sounds like you, then no one can take that away from you.”
Consistency + curiosity = originality.
🚀 Wrap-Up: Start Weird, Stay Curious
Want to sound more like KOAN Sound? Don’t try to copy them.
Instead:
- Play like no one’s watching
- Dive deep into your tools
- Record everything - even the weird stuff
- Treat sound design like storytelling
- Build your own rules… then break them
Try this:
Open your DAW and build a track using:
- One foley sound
- One resampled bass
- One drum loop made from scratch
Then flip it upside down.
🎶 What’s Next?
Drop a comment with your favorite KOAN-inspired technique or mention this article in your next weird sound experiment!
Let the chaos flow. 🎛🔥
Your masterpiece is one weird sound away.
Ever wondered how Boris Brejcha creates those hypnotic, high-energy tracks that destroy the clubs around the world?
Good news—you don’t need a million-dollar studio or a shelf full of analog gear to get close. Boris is all about speed, feel, and authenticity in the studio. And in this post, we’re breaking down his most actionable music production tips—straight from interviews and behind-the-scenes peeks into his process.
Let’s dive in.
1. Start with the Feel, Not the Plan
Boris doesn’t overthink. He doesn’t sketch out a full arrangement or plan 10 layers ahead. Instead:
“I just jam around in the studio… if something cool comes up, I go from there.”
Takeaway: Open your DAW and start messing around. If something clicks, run with it. If not — move on.
Photo by Techivation / Unsplash

2. Speed is Everything
Time kills creativity. That’s why Boris moves fast.
- Day 1: Come up with the idea
- Day 2: Arrange and mix
- Day 3: Finish it
If a project doesn’t take off quickly? Delete it. Seriously.
“Unfinished projects block your mind.”
Try it: Give yourself a 48-hour finish challenge. You’ll be shocked how much better your music flows.
3. Use What You Know (DAW & Tools)
Boris uses Cubase because he’s used it forever. It’s not about what’s trendy—it’s about what’s fast for you.
“It’s about knowing your tools inside out. That’s what makes you fast.”
He works in the box using software synths and plugins — Omnisphere, Trilian, Alchemy, Nexus, Massive, Fabfilter, and a hidden gem called “One” (cheap but killer for bass).
Photo by Techivation / Unsplash

4. Less Is More (No, Really)
This one’s important: fewer tracks, more automation.
“Sometimes, it’s better to delete a sound than add another one.”
Instead of stacking 40 layers, Boris focuses on movement — automating knobs, filters, effects to make each sound come alive. We also saw this with Skrillex in my previous article — he’s all about using automation to add life and variation, rather than piling on more layers.
Pro tip: Automate everything. Envelopes, filters, LFOs, even plugin dry/wet knobs.
5. No Compressors? Yup.
Mixing advice from Boris: almost no compression.
“Compressors destroy too much of the sound.”
Instead, he EQs carefully and uses a Hofa plugin to tame peaks by cutting certain frequencies — only when needed.
Photo by Caught In Joy / Unsplash

This makes the mix clean, dynamic, and punchy without the squash.
6. Swing > Grid
Mechanical drums kill groove. Instead of locked 1/16 notes, Boris uses tiny timing shifts (like 1/64) to get that natural, swingy flow that dancers feel in their bones.
“That groove is what makes people move.”
Photo by Marcela Laskoski / Unsplash

7. White Noise = Secret Weapon
Almost every Boris track uses white noise — especially for transitions or after breakdowns. Simple, powerful, effective.
Try this: Layer white noise with a filter sweep before your drop and hear the difference.
8. Mistakes > Perfection
Some of Boris’s best sounds came from doing something “wrong”—like stacking plugins in weird ways or hitting the wrong note.
“Mistakes in the studio can become the heart of a track.”
So next time something unexpected happens? Don’t delete it—use it.
9. Your Sound Comes from You
This is the big one. Boris constantly stresses this:
- Make music you love
- Don’t copy others
- Be weird, playful, and honest
“If you stand 100% behind your sound, fans will feel it—and love it.”

10. Real Talk: It’s Hard Work
Becoming a producer like Boris takes time. It’s not a 9-5. It’s late nights, trial and error, gigs, flops, and breakthroughs.
“It takes years. But it’s worth it.”
Stay consistent. Stay weird. Stay true.
Bonus: Boris’s Favorite Production Tools
Quick Reference Checklist
- DAW: Cubase
- Synths: Omnisphere, Trilian, Alchemy, Massive, “One”, Nexus
- Drums: Sample CDs (especially for shakers)
- Plugins: Fabfilter bundle, Hofa for peak control
- Technique: All-in-the-box, fast workflow, minimal layering, max automation

Final Thoughts
Boris Brejcha’s music feels alive and unique — and that’s no accident. It’s a result of smart workflows, fast decisions, and staying deeply connected to what feels right instead of what looks right.
If you’re looking to level up your music production, you don’t need to copy his sound. Just adopt his mindset.
Create. Delete. Play. Repeat.
Enjoyed this breakdown?
Drop a comment with your favorite Boris track and don’t forget to share these tips with a fellow producer!
Be creative!
]]>Ever wondered how electronic music giants like Skrillex approach their craft? It turns out, it's not always about complex setups or secret plugins. Drawing insights from curated conversations and interviews about his creative process, we uncover some fascinating and surprisingly simple tips from Skrillex himself.
Here are some key takeaways for anyone looking to enhance their music production workflow — straight from Skrillex:
🎵 Start Simple, Develop Later

Often, the initial idea for a track comes as a simple melody or feeling. Skrillex emphasizes starting with this basic concept — a skeleton version of the track. He mentions having a melody in his head and building around it with elements like a counter-melody and a simple bassline.
“The sounds themselves might not even be that interesting at this stage; the crucial part is getting the core idea down.”
Contrary to popular belief, many of his sounds end up being really simple. For example, he’s used dreamy, vibey textures made from just a Vengeance sample with a little glide and reverb. The real magic, he says, often happens later when processing the bounced audio.
⚡ Work Fast, Generate Ideas, Then Refine

Skrillex’s workflow thrives on speed and iteration. He often spends an hour on a basic idea, saves it, then moves on to several others. Later, he revisits them with “a fresh brain, a fresh ear.”
This strategy boosts creativity and enables more objective evaluation of which ideas are worth developing.
🔄 Be Open to Change

When revisiting his ideas, Skrillex is flexible. Love the sound but not the melody? Switch it up. The ability to pivot based on what works best in the moment is key to evolving a track.
🌍 Embrace International Sounds and Travel

Travel is "absolutely crucial" to Skrillex’s creativity. He draws inspiration from international sounds, stating:
“My whole sound is international sounds synthesized through my own brain and mind.”
Exploration and failure are both vital parts of learning — and they help shape his ever-evolving sound.
🔊 Find Sounds Anywhere

Skrillex finds sounds in the most unconventional places — cracking soda cans for snares, recording vocals on an iPhone. His philosophy? Use what you’ve got.
This approach champions resourcefulness and creativity over gear obsession.
🛠 Technology Is Your Friend — But Ideas Come First
While he keeps up with the latest tools and trends (including AI), Skrillex insists that ideas come first:
“Ideas, an aesthetic, and a concept are bigger than any tool.”
More accessible tools mean more people worldwide can now make music. That's a good thing.
🤝 Share Your Knowledge
Inspired by mentor Martin Dodd, Skrillex follows a powerful principle:
“You exchange wisdom for energy.”
He believes in giving away good ideas. The world needs more of them — so don’t hoard what you’ve learned. Share freely.
🔌 Plugins? Keep It Simple

When asked about his favorite plugins, Skrillex keeps it minimal:
- EQ: FabFilter Pro-Q3
- Limiter: FabFilter Pro-L
- Honorable Mention: Ableton’s built-in Erosion
Powerful tools don’t have to be exotic — often, they’re already in your DAW.
🧬 Automate for Life and Story

Skrillex uses automation to create movement and emotion. For instance, he automates:
- Bass frequencies (from mid-range to sub)
- Wet/dry effects or reverb size
- Subtle changes at the end of measures for transitions
He likens the evolution of a track to a story:
“A baby beat that is shy but gains confidence and strength over time.”
Automation breathes life into electronic music — and tells a story within the sound.
🎯 Final Thoughts
Skrillex’s approach isn’t about complicated gear or elite techniques — it’s about ideas, energy, simplicity, and exploration. Start with what inspires you, keep it simple, work fast, stay open to change, and use technology as a means to a creative end.

If you’ve ever scrambled to find missing samples, struggled with transferring your project to a new computer, or had trouble sending it to another producer for collaboration, you’re not alone. Fortunately, Ableton Live offers a neat feature called Collect All and Save, which gathers everything you need into one tidy folder. Let’s break down the process and explore a few tips for seamless collaboration.
Why Self-Contained Bundles Matter
Keeping all your samples, audio files, Max for Live devices, and configurations in one dedicated folder prevents missing assets when moving projects between computers. However, note that while Collect All and Save will copy your audio and device files, it does not include plug-ins. If your project uses third-party plug-ins, consider freezing and flattening those tracks (unless the target machine already has the same plug-ins installed). This step is especially important when transferring projects across different operating systems since only VST and VST3 formats are cross-platform, while Audio Units (AU) work only on macOS.
Step-by-Step Guide
Open Your Ableton Live Set
Launch your project in Ableton Live. Ensure all your tracks and settings are as you need them.
Save as a New Project Folder
Go to File > Save Live Set As and choose a new location outside any existing project folders. This creates a dedicated folder for your project and keeps it organized.
Collect All and Save
Click File > Collect All and Save. In the dialogue window, enable all options. This copies all used audio files and Max for Live devices into your project folder. Remember, plug-ins aren’t collected, so if necessary, freeze and flatten tracks that rely on them.
Prepare for Transfer
Locate your project folder, compress it (e.g., ZIP it), and transfer it to your collaborator or new computer. If you’re transferring to a different system (e.g., Windows to Mac), ensure you have compatible plug-in formats or have frozen tracks containing AU plug-ins.
Final Thoughts
By creating self-contained bundles, you ensure that every asset you need is in one place. This method prevents missing files, eases project transfers, and streamlines collaboration. Just follow the steps, and you'll have a hassle-free project ready for sharing or moving to another computer.
Happy producing!
]]>In this tutorial, we’ll build a simple but powerful React application to manage user preferences (such as theme and language) using React Context and TypeScript. Even if you’re new to React Context, by the end you’ll understand how it works, why it’s useful, and how to implement it in a type-safe manner.
Introduction
Imagine you’re building an application where users can toggle between a light and dark theme and switch languages. How can you manage this state across many components without passing props down through every layer? React Context is the answer. However, if you’re not familiar with Context or TypeScript, things might seem daunting. Don’t worry! We’ll break it down.
Step 1: Setting Up the Project
We’ll start with creating React app using the Vite TypeScript template. Follow these steps to set up your project:
Create the Project:
Open your terminal and run:
npm create vite@latest my-app -- --template react-ts
cd my-app
npm install
Project Structure:
After setting up, your file structure should look similar to this:
my-app/
├── package.json
├── tsconfig.json
├── vite.config.ts
└── src/
    ├── main.tsx
    ├── App.tsx
    ├── contexts/
    │   └── UserPreferences.tsx
    └── components/
        └── ThemeToggle.tsx
We’ll add our new files (contexts/UserPreferences.tsx, and components/ThemeToggle.tsx) into the src folder.
Step 2: Creating the Context and Provider
First, let’s build our context. This is where we encapsulate our state and its update logic. Create a new file called src/contexts/UserPreferences.tsx:
// src/contexts/UserPreferences.tsx
import { createContext, PropsWithChildren, useContext, useMemo, useState } from 'react';

// Defining our types
interface UserPreferences {
    theme: 'light' | 'dark';
    language: 'en' | 'es' | 'fr';
}

interface UserPreferencesContextData extends UserPreferences {
    setTheme: (theme: UserPreferences['theme']) => void;
    setLanguage: (language: UserPreferences['language']) => void;
}

interface ProviderProps {
    initialPreferences?: Partial<UserPreferences>;
}

// Create our Context object with an initial null value.
const UserPreferencesContext = createContext<UserPreferencesContextData | null>(null);

// Helpful display name for debugging
UserPreferencesContext.displayName = 'UserPreferencesContext';

// A custom hook that initializes and returns our context state
function useCreateUserPreferences({
    initialPreferences = {},
}: ProviderProps): UserPreferencesContextData {
    const [theme, setTheme] = useState<UserPreferences['theme']>(
        initialPreferences.theme ?? 'light'
    );
    const [language, setLanguage] = useState<UserPreferences['language']>(
        initialPreferences.language ?? 'en'
    );

    // We use useMemo to prevent unnecessary re-renders.
    return useMemo(
        () => ({
            theme,
            language,
            setTheme,
            setLanguage,
        }),
        [theme, language]
    );
}

// Provider component that wraps your app and makes the context available
export function UserPreferencesProvider({ children, ...props }: PropsWithChildren<ProviderProps>) {
    const preferences = useCreateUserPreferences(props);

    return (
        <UserPreferencesContext.Provider value={preferences}>
            {children}
        </UserPreferencesContext.Provider>
    );
}

// Custom hook to use our context in any component
export function useUserPreferences() {
    const context = useContext(UserPreferencesContext);

    if (!context) {
        throw new Error('useUserPreferences must be used within a UserPreferencesProvider');
    }

    return context;
}
Breaking It Down
Creating the Context:
We initialize the context with a null default. This forces consumers to use our provider so they always get the correct data.
Provider Component:UserPreferencesProvider wraps your components and supplies them with our state. The custom hook useCreateUserPreferences sets up the initial state and returns the state along with the updater functions.
Custom Hook (useUserPreferences):
This hook lets any component access the context. It also provides a helpful error if you forget to wrap your component tree in the provider.
Step 3: Using the Context in a Component
Let’s create a simple component that toggles the theme. Create src/components/ThemeToggle.tsx:
// src/contexts/ThemeToggle.tsx
import { useCallback } from 'react';

import { useUserPreferences } from '../contexts/UserPreferences';

export function ThemeToggle() {
    const { theme, setTheme } = useUserPreferences();

    const toggleTheme = useCallback(() => {
        setTheme(theme === 'light' ? 'dark' : 'light');
    }, [theme, setTheme]);

    return <button onClick={toggleTheme}>Toggle theme (Current: {theme})</button>;
}
Here, our ThemeToggle component uses the custom hook to get the current theme and the function to update it. When clicked, it toggles between "light" and "dark".
Step 4: Wrapping It All Together
Finally, we need to integrate our provider into the application. Update your main src/App.tsx file as follows:
// src/App.tsx
import { UserPreferencesProvider } from './contexts/UserPreferences';
import { ThemeToggle } from './components/ThemeToggle';

function App() {
  return (
    <UserPreferencesProvider initialPreferences={{ theme: 'dark' }}>
      <div style={{ padding: '2rem' }}>
        <h1>Type-Safe React Context Example</h1>
        <ThemeToggle />
      </div>
    </UserPreferencesProvider>
  );
}

export default App;
Running the Application
With everything in place, start your development server:
npm run dev
Open http://localhost:5173 (or the URL provided in your terminal) in your browser. You should see a page with a button that toggles the theme. The current theme is displayed on the button itself!
Recap: Why Use This Pattern?
Type Safety:
By defining our types, we ensure that any misuse of the context is caught at compile time. This helps prevent bugs and improves the developer experience.
Encapsulation:
The logic to manage state is isolated within a custom hook (useCreateUserPreferences) and a provider. This separation makes our code easier to test and maintain.
Performance:
Using useMemo ensures that the context values only update when necessary, reducing unnecessary re-renders in our components.
Developer Experience:
Clear error messages (like when useUserPreferences is used outside its provider) and a discoverable API make this pattern pleasant to work with.
Conclusion
In this tutorial, we walked through the process of creating a type-safe React Context to manage user preferences using Vite and TypeScript. We started by setting up the project with Vite, defined our types, built our context provider and custom hook, and finally integrated everything into a simple React app. This pattern not only makes your state management robust but also improves performance and developer experience.
By following this approach, you can scale your application and keep your state logic clean and well-organized. Happy coding!
Feel free to experiment and expand on this pattern—perhaps add more user preferences or split context domains as your application grows. Enjoy your journey into type-safe React Context!
]]>
When a stuffy nose lingers despite traditional remedies, it's time to tap into your body's natural decongestant: physical activity. Engaging in exercise can provide immediate relief from nasal congestion, showcasing the body's remarkable self-regulating mechanisms.
The Science Behind Exercise-Induced Nasal Relief
Physical activity triggers a cascade of physiological responses that alleviate nasal congestion:
-
Vasoconstriction: Exercise stimulates the sympathetic nervous system, leading to the constriction of blood vessels in the nasal mucosa. This reduces swelling and opens up nasal passages, facilitating easier breathing.
-
Increased Airflow: Elevated heart rate and respiratory activity during exercise enhance nasal airflow, helping to clear mucus and reduce blockage.
Effective Exercises to Combat Nasal Congestion
Basically, one or two sets of any exercise will do the job, but if you need motivation, here are some that work best for me:
-
Push-Ups: Performing push-ups can provide quick relief by opening your nasal passages and reducing inflammation.
-
Brisk Walking: If you're not a fan of strength exercises, engaging in light exercise, such as walking, can loosen sinus congestion and pressure by stimulating the flow of nasal discharge, helping you feel better faster, and for a longer period.
Scientific Evidence Supporting Exercise as a Decongestant
Research has demonstrated the efficacy of exercise in reducing nasal resistance:
-
A study published in the American Review of Respiratory Disease found that exercise causes a fall in nasal resistance, likely due to sympathetic vasoconstriction in the nasal mucosa.
-
Another study reported that nasal mucous velocity and nasal airflow resistance improved during and after submaximal exercise, indicating enhanced nasal clearance.
Embrace Your Body's Natural Healing Abilities
By engaging in these simple physical activities, you're not only addressing immediate discomfort but also harnessing your body's innate resilience. Your body is equipped with numerous defenses that operate without conscious control, maintaining your health and strength.
Affirmation for Well-Being
Remember to affirm: "My body is a perfect mechanism with numerous defenses that I do not need to control. It is healthy and strong!"
Maintaining a positive mindset can support overall well-being and motivate you to engage in health-promoting activities.
Incorporating these simple techniques into your routine can provide relief from nasal congestion and enhance your appreciation for the body's natural healing capabilities.
]]>
The speed of light is often thought to be the fastest thing in the universe, reaching an exact 299,792,458 meters per second. To us, that seems incredibly fast! But in the vastness of space, light is actually pretty slow.
In this post, we’ll dive into the speed of light and explore how it compares to other forces in the universe.
What is Light?
Most people think of light as what we see—visible light. But visible light is only a small part of the electromagnetic spectrum. This spectrum includes:
- Gamma Rays
- X-Rays
- Ultraviolet Light
- Infrared Light
- Microwaves
- Radio Waves
Each type of light is classified by its wavelength. Photons are the particles that make up light, and they carry electromagnetic radiation.
Fun Fact: Did you know light actually exerts force? Though it’s too small for us to feel, photons apply pressure when they hit objects!
Rainbows: More Than Just Seven Colors
Photo by Jared Erondu / Unsplash

One of the best ways to see light in action is by looking at a rainbow. Rainbows show the visible spectrum of light, but there's a misconception that they only have seven colors.
In reality, the colors we see are just different wavelengths of visible light. Red has the longest wavelength, while violet has the shortest. There are many more wavelengths in between.
Light vs. Sound: The Speed Showdown
Photo by NOAA / Unsplash
Let’s compare the speed of light with the speed of sound:

- Speed of sound: ~343 meters per second
- Speed of light: ~299,792,458 meters per second
Light is nearly 1 million times faster than sound! That's why when we see lightning, we witness it almost immediately, but the thunder follows much later.
The Cosmic Journey at Light Speed
Photo by Arnaud Mariat / Unsplash

What if we could travel at the speed of light? The distances in space are so vast that even light takes time to travel:
- Around Earth: 0.134 seconds
- From Earth to the Sun: 8 minutes and 20 seconds
- From Earth to Neptune’s orbit: Over an hour
And that’s just within our solar system! The closest star to us, Proxima Centauri, is more than 4 light-years away, meaning even at light speed, the journey would take over 4 years!
In the context of the entire universe, where galaxies are separated by millions or even billions of light-years, light’s pace starts to seem incredibly slow. While it can zip around Earth in milliseconds, traversing the cosmos takes unimaginable amounts of time.
Conclusion
The speed of light is a fundamental concept in physics, shaping our understanding of the universe. Though it seems fast to us, it’s still slow when considering the vastness of space. Yet, this speed plays an essential role in our daily lives and in exploring the cosmos.
Light may be slow on a cosmic scale, but it remains key to unlocking the mysteries of the universe.


Lemon water is often touted for its health benefits, but many people don't realize just how impactful it can be. Here are the key reasons you should consider incorporating lemon water into your daily routine:
1. Reduces Fatty Liver
The phytonutrients in lemon water can significantly improve hepatic steatosis, commonly known as fatty liver. These nutrients help dissolve fat in the liver, which can be further enhanced by a ketogenic diet. Adding lemon to your water can accelerate this process.
2. Lowers Cholesterol
Lemon water aids in increasing bile flow, which helps reduce excess cholesterol. This is particularly beneficial if you have a sluggish liver or gallbladder, as it helps clear backed-up cholesterol from your system.
3. Supports Weight Loss
While lemon water doesn't directly cause weight loss, it helps by lowering insulin resistance and blood sugar levels. Lowering insulin is crucial for fat cells to shrink, making lemon water a great addition to a weight loss regimen.
4. Anti-Aging Benefits
Studies on animals have shown that regular consumption of lemon water can extend lifespan and improve the health of the microbiome, your body's friendly bacteria. Though these studies are preliminary, the potential for long-term benefits is significant.
5. Anti-Cancer Properties
Lemon water contains phytonutrients that have shown the ability to kill malignant cells in the tongue, lung, and colon in test tube studies. While not a cure, it can be a supportive measure against cancer.
6. Prevents Kidney Stones
Citrate in lemon juice binds with oxalates, preventing the formation of calcium oxalate kidney stones. Increasing your intake of lemon juice can significantly reduce the risk of kidney stones, especially if you're prone to them.
7. Provides Vitamin C
Freshly squeezed lemon juice is an excellent source of vitamin C, offering up to half of your daily requirement. Vitamin C is vital for immune function, collagen formation, and preventing various deficiencies and conditions.
8. Boosts Circulation and Reduces Inflammation
Lemon water is rich in phytonutrients that improve circulation and reduce symptoms of conditions like hemorrhoids, leg sores, and varicose veins. These nutrients also have antibacterial, antiviral, and antifungal properties, making lemon water a powerful addition to your diet.
Incorporating Lemon Water into Your Routine
To reap these benefits, add lemon juice to your water regularly. For maximum effect, combine it with apple cider vinegar. Use the juice from a whole lemon or a few teaspoons of bottled lemon juice (preferably unpasteurized to retain vitamin C).
Lemon water is a simple, natural way to boost your health. Start your day with a glass and enjoy the multitude of benefits it offers!
]]>Running large models in ComfyUI can be challenging, especially when dealing with limited GPU memory (VRAM). However, by adding your system RAM, you can run models that exceed your GPU's VRAM capacity. Learn how in this article!
First, What is FLUX?
Black Forest Labs, the team that helped develop the original Stable Diffusion, recently has unveiled Flux, the largest open-source text-to-image model to date. Boasting an impressive 12 billion parameters, Flux produces visuals that rival those of Midjourney and may surpass any other model available, whether open-source or proprietary.
In this guide, I'll show you how to run the new Flux model on a GPU with just 12GB of VRAM (or less) in ComfyUI! We'll cover the necessary setup, including a small bonus for Linux users.
Let's begin.
Installation and Setup
1. Download the Required Files
- Model: Download either
flux1-dev.sft(Standard) orflux1-schnell-fp8.safetensors(requires fewer steps). Place the file in theComfyUI/models/unet/directory. I currently use theschnellversion. - VAE: Download
ae.sftand place it in theComfyUI/models/vae/folder. - Clip and T5 Encoders: Download
clip_l.safetensorsand choose one T5 Encoder:t5xxl_fp16.safetensorsort5xxl_fp8_e4m3fn.safetensors(smaller). Store these in theComfyUI/models/clip/directory. I currently use thefp8version.
2. Configure ComfyUI for Low VRAM Usage
To ensure the setup runs within the limits of a 12GB VRAM GPU, add the --lowvram argument when running ComfyUI: python main.py --lowvram. This setting directs the system to use system RAM to handle VRAM limitations.
3. Custom Script for Linux Users
As a Linux user, I streamline the process with addind a custom ./start.sh script in the ComfyUI folder. This script manages the virtual environment and always starts ComfyUI with the necessary parameters:
#!/bin/bash
# Custom script for activating the virtual environment and starting comfyui

# Create the virtual environment if it doesn't exist already
if [ ! -d ".venv" ]; then
    python3 -m venv .venv
    source .venv/bin/activate
    pip install -r requirements.txt
fi

# Activate the virtual environment and start comfyui
source .venv/bin/activate
python main.py --lowvram
The script creates a virtual environment (.venv) which isolates the ComfyUI environment and helps managing dependencies, ensuring a smoother experience and no conflicts with your global python packages. You can adjust the script to fit your setup.
* Make sure to make the script executable before using it: chmod +x ./start.sh
4. Update and Run ComfyUI
Ensure your ComfyUI installation is up-to-date then start the web UI by simply running ./start.sh or python main.py --lowvram if you don't want to use isolated virtual env.
Download this workflow and load it in ComfyUI by either directly dragging it into the ComfyUI tab or clicking the "Load" button from the interface. After loading, adjust the nodes to use the models you've just downloaded.
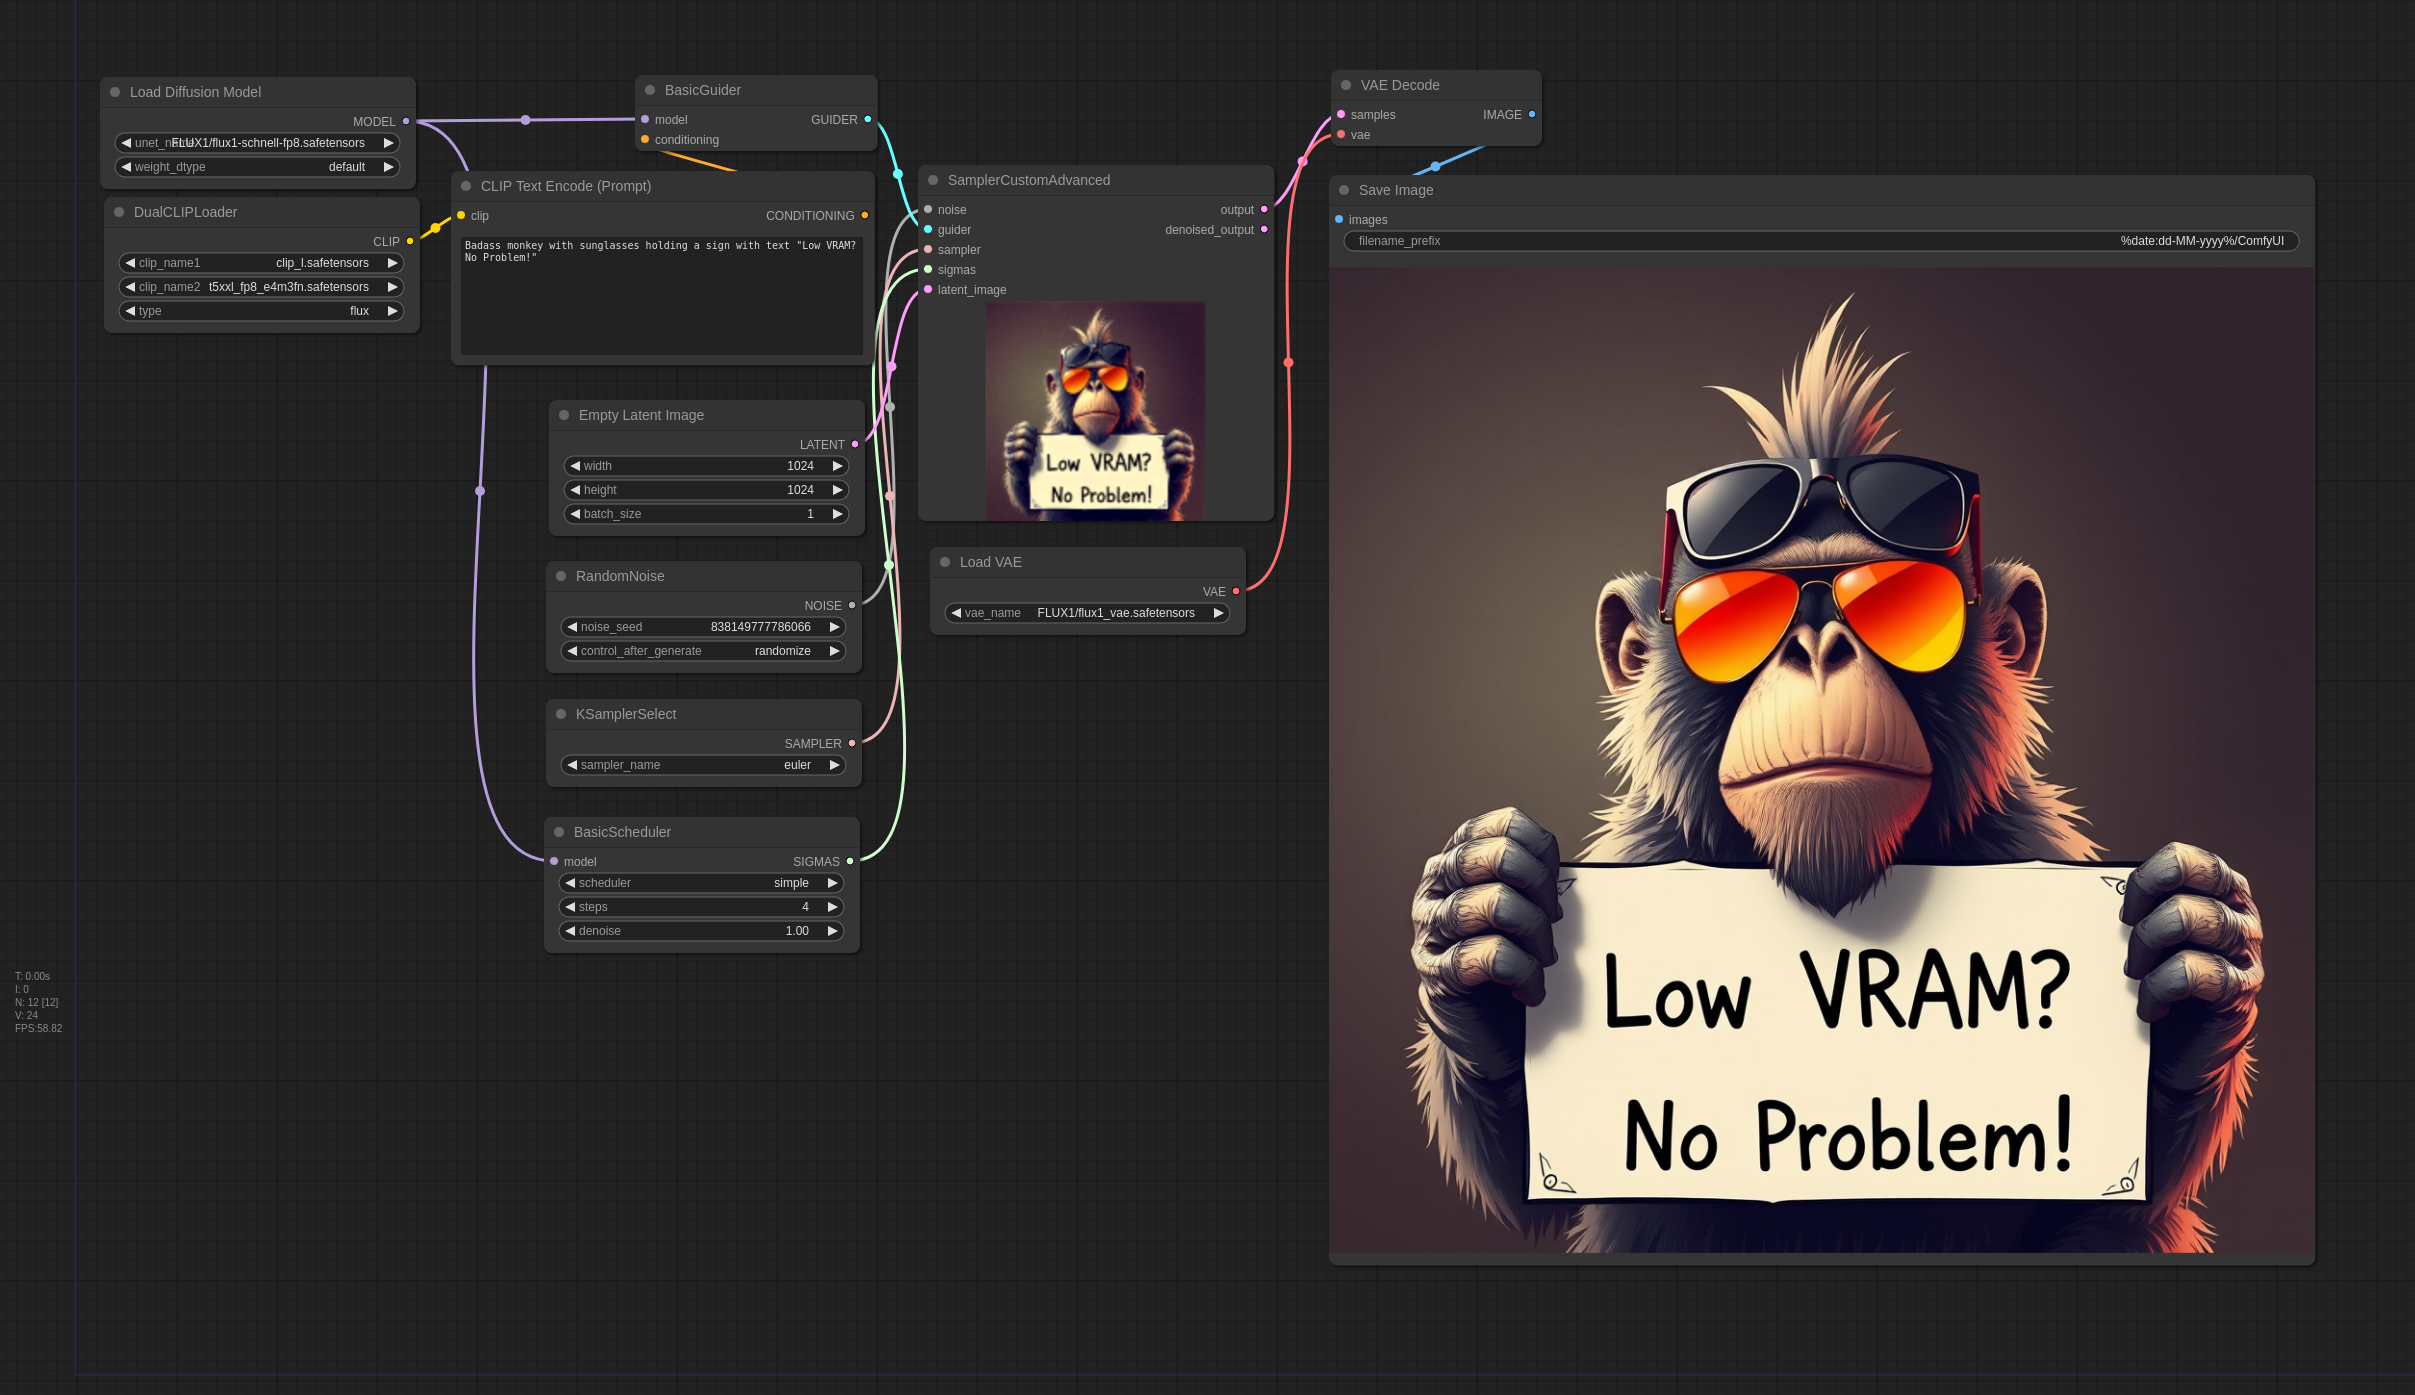
Finally, run the workflow by clicking on "Queue Prompt" button.
* Be patient; The generation process takes around 1 minute with 4 steps, but it's worth the waiting!
Hardware and Performance
My Setup:
- CPU: Intel Core i5-13600KF
- GPU: NVIDIA GeForce RTX 3060 with 12GB VRAM
- Memory: 32GB DDR5 5200MHz RAM + Linux Swap File
Important Considerations
- Memory Usage: The setup can consume nearly all available 32GB of RAM. Systems with less RAM may experience slowdowns or instability, especially during peak memory usage.
- Text Encoding: The time for text encoding can vary. Notably, after a period of inactivity, the process can take up to 200 seconds. A more powerful CPU can help reduce this time.
- Model Choice: For beginners, the Flux.1 Schnell model is a good starting point due to its simpler setup and fewer required steps.
Conclusion
Running larger models on a GPU with limited VRAM is achievable with the right setup and configurations. By compensation low VRAM with system RAM, you can effectively run advanced models like Flux on mid-range GPUs. This guide provides the necessary steps and considerations to ensure smooth operation, allowing you to explore the creative possibilities within ComfyUI.
Resources:
]]>